وب تفریحی و سرگرمی کرمک
انواع مطالب جالب و سرگرم کننده اینترنتوب تفریحی و سرگرمی کرمک
انواع مطالب جالب و سرگرم کننده اینترنتChoosing the proper tyres for winter
Choosing the proper tyres for winterTelegraph journalist Chris Knapman visits the Porsche expertise Centre to place winter and summer tyres to the take a look at
Sat at all-time low of a hill, its surface glossy with ice, you push the accelerator to the ground and look all of these expensive differentials to try and do their job.
You creep forward, however not as you would possibly suppose, for whereas the speedo is ascent it's wheel speed and not road speed that you’re gaining. The wheel has gone light-weight in your hands and has very little influence on your direction of travel, inflicting panic as your two-tonne automobile begins to wander toward the verge. You stop before you hit something, however currently you’re stuck. And you’re desire you had endowed during a set of these winter tyres that everyone keeps talking concerning.
In fact, the proper term is cold-weather tyres, however “winter tyres” has become the vernacular therefore that’s what we’ll persist with. And to check specifically however sensible they're we tend to spent every day at the Porsche expertise Centre at Silverstone, that with great care happens to own its own "Ice Hill" close between the high-speed take a look at tracks. This seven per cent slope options a low-friction surface and 2 computer-controlled water jets to simulate the type of conditions that for the last 2 years have sent British roads into a state of chaos.
Time to place into follow what we tend to preach.
Related Articles

Why it is sensible to suit winter tyres
twenty five Nov 2013
obtaining the proper automobile breakdown protect winter
twenty five Nov 2013
it is the huge Freeze as kingdom faces period of time of 'sub-zero' temperatures
seventeen Nov 2013
Drivers use credit cards and alcohol to clear icy screens
ten Dec 2012
getting ready your automobile for winter driving
twenty three Dec 2013
Winter tyres explained
eighteen Nov 2013
A two-wheeled drive automobile on winter tyres is healthier than a four-wheel-drive automobile on summer tyres...
Having regarding (and it had been an in depth thing) managed to zigzag zigzag our thanks to the highest of the Ice Hill during a four-wheel-drive Cayenne on summer tyres, we tend to square measure reaching to strive one thing slightly completely different.
Climbing down from the massive SUV I land within the seat of a rear-wheel drive, superior Porsche Boxster and come back to all-time low of the Ice Hill. In theory the Boxster shouldn’t stand an opportunity here, however as I slot the gearlever into drive and touch the throttle it begins to maneuver. Be too formidable with the facility and therefore the rear wheels can still spin, however with slightly of restraint it ascends hill with ease, its steering crisp and controlled. The distinction, of course, is that it’s carrying winter tyres.
...but a four-wheel-drive automobile with winter tyres is healthier once more
With that expertise below our belt it’s no surprise to seek out that swapping to our third and final automobile, a four-wheel-drive Cayenne on winter tyres, we tend to create it to the highest of hill with ease. In fact, such is that the grip on supply that you simply ought to be quite aggressive with the controls for any price dramatic to happen.
It’s an identical story once we place the cars through a slalom, now travel down the Ice Hill. On summer tyres the Cayenne doesn’t even create the primary flip, understeering dispiritedly before threatening to travel into an enormous spin. strive identical within the Boxster on cold-weather tyres and you continue to ought to work the steering, applying 0.5 a flip of opposite lock as you guide the automobile between the obstacles, however the distinction is that as presently as you straighten the wheel the tyres regain grip.
Again tho', it’s the Cayenne on winter tyres that puts within the strongest performance, weaving through the slalom while not a retardant. And it’s not simply that you simply will see and feel the grip, however you'll hear it too, the tyres thrumming blithely as they bite into the surface.
Four-wheel-drive may facilitate to you get, however it’s of no use once you’re making an attempt to prevent
Our driver within the Cayenne on summer tyres may need had a torrid time aiming to the highest of hill, however currently there he will continue on his manner. Before he is aware of it he's heading back downhill once more at a gradual 24mph once, within the distance, he sees a lorry has jack-knifed and is obstructing the road. He brakes as exhausting as he will, however whereas he will feel the ABS system pulsing through the pedal the automobile sails forward, its speed barely decreasing because the tyres glide across the paved surface. on it same seven per cent Ice Hill it takes fifty five metres to come back to a whole stop. From the driver’s seat it's, quite honestly, terrifying.
Behind, the Cayenne with winter tyres is travel at precisely the same speed. recognizing the lorry at identical purpose it too performs Associate in Nursing emergency stop. once more the ABS pulses, however now the nose dives because the tyres grip, and therefore the automobile involves a halt in only thirty metres.
In fact, therefore effective square measure the tyres that it takes the Cayenne simply 5 metres a lot of to prevent than the a lot of lighter Boxster.
What makes winter tyres therefore effective?
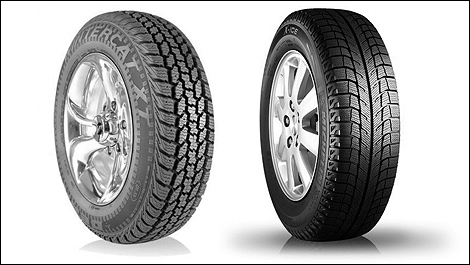
First, the tread pattern. Winter tyres feature a lot of “sipes” (or grooves) among the tread blocks (Michelin’s winter tyres feature concerning one,500 sipes, compared with two hundred for a standard tyre) to supply traction and stability. In snow these sipes really fill with snow, that then grips to the snow on the road (imagine rolling a snowball) to supply traction. there'll even be the next groove to rubber quantitative relation to assist clear water and scale back aquaplaning.
Winter tyres even have a distinct compound, with a high-silica content that means that they keep softer, a lot of pliable and therefore supply a lot of grip at low temperatures than summer tyres.
When sorting out new rubber, SUV drivers may also encounter Mud and Snow tyres, that square measure outlined by TyreSafe as those “whose tread and structure square measure designed to grant higher handling than traditional tyres in slush and contemporary or melting snow”. However, there aren't any rules stating that such tyres ought to conjointly feature a winter-specific compound, that is therefore essential to performance in cold conditions. to confirm that the tyres square measure winter-specific, rummage around for a snowflake or snow-topped mountain image on the sidewall.
When ought to I match winter tyres and the way a lot of can they cost?
Due to their compound, winter tyres inherit their own as presently because the temperature drops below seven degrees C. that's to mention, from late Gregorian calendar month till March you’ll take pleasure in superior acceleration, braking and handling – اسپری پنچرگیری لاستیک – if your automobile has winter tyres fitted. That applies on dry, clear roads, and their advantage over summer tyres solely will increase in rain, snow and ice.
As for value, it depends on the automobile you drive and therefore the tyre you decide on to shop for. For the Cayenne we’ve been testing, Associate in Nursing approved wheel and winter tyre package from Porsche prices from £1,600, and for the Boxster from £1,800. Audi sells wheel and tyre packages from £799 (or tyres solely from a really cheap £325), and at the present is throwing during a year’s margin help if you purchase wheels and tyres.
The other choice is to supply your own winter rubber, that you’ll be paying concerning £350 and £40-60 for fitting, reckoning on that tyres you decide on and wherever you're taking them to be fitted. For the latter, it’s well value phoning around for a number of quotes.
Remember too that the performance of a summer tyre can vary hugely reckoning on what proportion you pay, and therefore the same applies to winter rubber.
Other issues
- Last winter the Association of British Insurers revealed a winter tyre agreement, stating that insurers wouldn't charge an extra premium if customers prefer to match winter tyres. As such, there shouldn’t be any associated value with creating the swap, however it’s value a fast courtesy decision to let your underwriter grasp.
- It sounds obvious, however contemplate wherever you’re reaching to store your existing wheels and tyres. If you don’t have space reception then your main dealer may need area and be happy to store them. usually this can value concerning £10 a month, though some dealers may need special offers (Suzuki is presently charging customers £49.99 for a year).
- keep in mind that winter tyres should be fitted to any or all four wheels. solely fitting them to the driven wheels on a two-wheel-drive automobile can lead to unbalanced handling and braking.
- If you already use winter tyres keep in mind to ascertain that they need enough tread. The AA advises a minimum of 3mm for winter driving, and no but 2mm.
Troubleshooting wireless keyboard and mouse problems article
Apple wireless mouse operation and maintenance coaching
Troubleshooting wireless keyboard and mouse problems article
Some desktop computers with wireless keyboards or mice ar shipped with the devices pre-paired and also the batteries pre-installed. As long because the wireless devices ar supercharged on once the pc starts up, no further steps ought to be necessary to create them work. If one or each of the wireless devices don't operate obviously, use the data below to spot and resolve the difficulty.
Note: These directions work with mack OS X v10.5 Leopard. For troubleshooting wireless keyboard and mouse problems in mack OS X v10.6 Panthera uncia, see Desktop computers: Troubleshooting wireless mouse and keyboard problems.
Resolution
Make sure the wireless keyboard and mouse ar turned on
If the system has already started up and also the keyboard or mouse indicator lightweight is flashing, the keyboard or mouse is "discoverable" by the pc and will not presently be paired with the pc. For a lot of info on pairing wireless devices talk to the way to found out your Apple Wireless Keyboard.
Reset the Bluetooth device
First attempt turning your device off so on once more. Once supercharged on, the wireless device can stay within the "discoverable" mode for 3 minutes. For a lot of information talk to sanctioning ascertainable mode.
Restart the pc
Try restarting your pc to envision if that addresses the difficulty. If not, attempt closing down your pc, waiting a second, so beginning it copy once more.
Check battery levels
Your mack can inform you after you ought to replace the batteries within the keyboard and mouse. you'll conjointly manually check the battery level of the Apple Wireless Keyboard and Apple Wireless Mouse by following these steps:
opt for System Preferences from the Apple menu.
opt for Keyboard & Mouse from the read menu.
choose the Bluetooth tab.
Note: The battery indicator doesn't show battery levels of non-Apple Bluetooth mice and keyboards. If you do not see electric battery indicator, confirm you're exploitation AN Apple Wireless Mouse or Keyboard.
Check for signal interference
Because Bluetooth works by transmittal signals through the air, some things will interfere with the wireless affiliation. Avoid things within which metal objects come back between the device and also the pc. do not place the pc underneath a metal table or fast away behind a metal cupboard. Keep conductor phone base stations, microwave ovens, and different electrical devices that treat a two.4 rate information measure away, and confirm that the wireless device and pc are not quite thirty feet except for one another.

Archived - Apple Wireless Mouse: the way to Install or Replace Batteries
article source : موس بی سیم طرح اپل
The Apple Wireless Mouse uses 2 AA batteries. to put in the batteries:flip the mouse over and switch it off.
take away the battery compartment cowl.
Slide the batteries into the battery compartment as shown in Figure one.
Replace the battery compartment cowl.
flip the mouse on if you're able to use it.
Figure one Inserting batteries
If you've got ne'er paired your mouse along with your pc, you'll have to try to to that before you'll use it. See Bluetooth: the way to found out Your Apple Wireless Mouse for a lot of info.
If you've got antecedently paired your mouse along with your pc, you are doing not got to found out the mouse once more once replacement the batteries. The mouse ought to mechanically try itself with the pc many moments once you switch it on.
The Apple Wireless Mouse comes with 2 nonrechargeable AA metallic element batteries. you'll conjointly use basic or reversible AA batteries.
Important: confirm to place the positive and negative ends of the batteries within the mouse as shown in Figure one. The mouse won't activate if the batteries ar incorrectly put in.
When you modification the batteries, replace all of them at identical time with identical reasonably battery. With metallic element and different battery sorts, don't open the batteries, expose them to flame, or in the other means violate the manufacturer's directions. get rid of batteries consistent with native laws and rules.
For additional info, see the Apple Wireless Mouse User Guide.
Archived - Apple Wireless Keyboard: the way to install or replace batteries
The Apple Wireless Keyboard comes with four nonrechargeable AA metallic element batteries. you'll conjointly use basic or reversible AA batteries.
Note: If you wish to put in or replace batteries within the newer metallic element Apple Wireless Keyboard, see this text.
To install the batteries
flip the keyboard over and switch it off.
take away the battery compartment cowl and batteries.
Slide the batteries into the battery compartment as shown in Figure one.
Replace the battery compartment cowl.
flip the keyboard on if you're able to use it.

Figure 1
Inserting batteries
If you've got ne'er paired your keyboard along with your pc, you'll have to try to to that before you'll use it. See this text for a lot of info.
If you've got antecedently paired your keyboard along with your pc, you are doing not got to found out the keyboard once more once replacement the batteries. The keyboard ought to mechanically try itself with the pc many moments once you switch it on.
Important: confirm to place the positive and negative ends of the batteries within the keyboard as shown in Figure one. The keyboard won't activate if the batteries ar incorrectly put in.
When you modification the batteries, replace all of them at identical time with identical reasonably battery. With metallic element and different battery sorts, don't open the batteries, expose them to flame, or in the other means violate the manufacturer's directions. get rid of batteries consistent with native laws and rules.
For additional info, see the Apple Wireless Keyboard User Guide.
اطلاعات ساعت دیواری طرح رخ
اطلاعات ساعت دیواری طرح رخ

این ساعت همانطور که اسمش نمایان است شبیه رخ انسان است
بدنه این ساعت دیواری از پلکسی گلاس ساخته شده است
همچنین موتور این ساعت ساخت کشور تایوان است و دارای گارانتی 6 ماهه است
هماهنگی این ساعت با بکگراند دیوار باعث شده است در هر محلی خودنمایی کند

مشخصه های ساعت دیواری طرح رخ :
مواد سازنده بدنه ساعت : پلکسی گلاس ضد خش و قابل شستشو در رنگ بندی مشکی
موتور ساعت با کیفیت بالا ساخت کشور تایوان و ابعاد 30 در 30 سانتی متر
هم اکنون می توانید ساعت دیواری طرح رخ را به صورت اینترنتی سفارش داده و درب منزل تحویل بگیرید
برای ورود به فروشگاه اینترنتی و خرید اینترنتی این ساعت روی لینک زیر کلیک نمایید
ساعت دیواری طرح رخ
این ساعت همانطور که اسمش نمایان است شبیه رخ انسان است
بدنه این ساعت دیواری از پلکسی گلاس ساخته شده است
همچنین موتور این ساعت ساخت کشور تایوان است و دارای گارانتی 6 ماهه است
هماهنگی این ساعت با بکگراند دیوار باعث شده است در هر محلی خودنمایی کند
مشخصه های ساعت دیواری طرح رخ :
مواد سازنده بدنه ساعت : پلکسی گلاس ضد خش و قابل شستشو در رنگ بندی مشکی
موتور ساعت با کیفیت بالا ساخت کشور تایوان و ابعاد 30 در 30 سانتی متر
هم اکنون می توانید ساعت دیواری طرح رخ را به صورت اینترنتی سفارش داده و درب منزل تحویل بگیرید
برای ورود به فروشگاه اینترنتی و خرید اینترنتی این ساعت روی لینک زیر کلیک نمایید
ساعت دیواری طرح رخ
How to Maintain electric battery powered
How to Maintain electric battery poweredmake certain the metal contacts within the battery holder aren't unsound. The spic-and-span battery you place in won't fix the matter if the metal contacts ar dirty. If the metal isn't shiny and clean then scrape it exploitation sandpaper (220 grit or there-about can work fine). If you do not have sandpaper then you'll use alittle flat-bladed screw driver or different 'pointy' metal tool. If this fixes the matter, then you've got gotten off the hook within the best doable manner.
Ad
Check the static magnet. If the matter still persists, then the Lavet kind stepper in your Quartz clock in all probability incorporates a slightly misaligned static magnet, (i.e., the rotor). you wish to maneuver the magnet back to the right position. So, you've got ne'er detected of this thing? attend Wikipedia.com and skim the article on "Lavet kind stepping motor".
Please note that this text solely shows a super-small stepper motor like is employed in an exceedingly wrist-watch. The one in your clock is way larger and easier to figure on. strive to not let yourself be intimidated. it's not that arduous.
Perform a straightforward check to verify that your Quartz clock has this sort of drawback. Lay your clock on a flat table with the face of the clock inform up at the ceiling. See if the used incorporates a drawback wherever it starts and stops or perhaps stops utterly. If so, then it's probably that the little static magnet has slipped backwards and is not any longer within the same horizontal plane because the metal of the magnet.
this is often currently the second a part of this straightforward test: Flip the clock over in order that the force of gravity can pull the miscroscopic magnet back to its correct position. The face of the clock can currently be facing down towards the ground.
If your table is created out of glass then you'll sit on the ground and appearance up through very cheap of the table to envision if your clock is running properly. Or, you'll simply choose the put down and hold it higher than your head to appear at it. you wish to stay it within the same horizontal downward facing position. If your clock works fine within the downward position however not within the upward position, then you've got a misaligned magnet.
take away the miscroscopic black plastic box from the rear of your clock. this is often the box that holds the AA battery within the back and therefore the clock hands on the front. it's referred to as a stepping-type clock movement. To do this, begin by removing the clear plastic cowl on the front of the clock. it always has three plastic tabs or indents round the environs. See if you'll find wherever these three tabs ar.
Use alittle flat screwdriver to softly pry these three tabs loose and take away the clear plastic front cowl.

Gently take away the three clock hands, (the used, the big hand, then the hour hand). simply pull outward (on one hand at a time) and that they can pop off. place them in an exceedingly tiny instrumentality off to the facet to stay them safe. strive to not drop them on the ground and particularly to not step them.
On the rear of your clock, there ar a pair of giant black plastic tabs or hooks that firmly mount the clock movement to the rear of the clock. Gently pry these a pair of tabs outward only enough to permit you to get rid of the clock movement from the rear of your clock.
take away the battery.
Open up the clock movement and appearance within. to try and do this you wish to get rid of the black plastic cowl on the rear of your clock movement. Be careful. it's three unharness tabs, not 2. there's a hard-to-see tab within the middle of the battery compartment. strive to not break any of those tabs as a result of you wish them to carry your clock movement along. Gently take away the rear cowl and appearance within. If any of the miscroscopic white plastic gears have fallen out of their correct position, then place them back.
acquaint yourself with the components within your clock movement.
See ( ساعت دیواری طرح قهوه ) printed circuit? There ar a pair of terribly small copper wires that connect this circuit board to a wire coil mounted beneath. strive to not break these wires. they're solely zero.003 inches in diameter and ar terribly fragile. Please notice that the coil of wire is wrapped around one leg of a comparatively giant "U" formed piece of flat metal. These a pair of items along kind associate degree magnet.
once electrical phenomenon flows within the coil of wire then it makes the iron-alloy metal core become magnetic. there's associate degree air gap at the open finish of the "U". this is often wherever the miscroscopic static magnet goes. Together, these three components kind a Levat kind stepper. The static magnet is created within the form of a toroid, (or donut).
hooked up to at least one facet of the magnet may be a cabbage butterfly plastic gear with teeth thereon. it's referred to as a rotor as a result of it "rotates", (i.e., it spins around in a circle sort of a bicycle tire). there's associate degree shaft or very little plastic rod that goes at ninety degrees during the middle of our magnetic toroid. the miscroscopic magnet should be lined up right within the middle of the flat metal that surrounds it, (i.e., the electromagnet), alternatively our very little motor does not run fine.
One finish of this small plastic shaft for our rotor goes into alittle hole that is found within the black plastic cowl that you took off. this small hole is simply too deep! this is often the total drawback. we'd like to cut back the depth of this hole in an exceedingly precise manner. Doing thus can probably change the clock to figure utterly for several years to come back. The difficult question here is "How can we do this? however can we live or somehow verify simply specifically however deep this hole ought to be? conjointly, however can we then refill very cheap of this hole in an exceedingly precise manner, (to within many thousandth's of associate degree inch)?"
make certain that you have settled the precise hole within the back cowl that's meant for holding the stepper-motor rotor in situ. Open up the opening in order that it goes all the manner through. strive to not use alittle drill. you may scuff the edges of the opening. this could considerably speed up the speed at that these plastic components would wear out.
believe it. you would like your clock to endure a few years to come back. this suggests that your very little rotor are going to be spinning in situ and rubbing against the within of this hole day and night for several years. For long life, it's vital that at the places wherever plastic rubs up against plastic that each surfaces ought to be terribly sleek.
No, a drill isn't suggested. The vital issue is that it's created out of hardened steel which the tip. The plastic wall at the rear of this hole is simply concerning 1/64 th of an in. thick. simply pushing thereon (from within the hole) with the right style of sharp, pointy metal tool can poke a hole all the manner through.
the precise size of this hole might vary from manufacturer to manufacturer, thus it's within the vary of zero.025 to 0.050 inches in diameter. Once you've got poked a hole through the rear wall from the within, then flip the rear cowl around and clean it up from the surface. you would like the opening to be nicely opened-up in order that you'll get at it from the rear, (while the clock is running in an exceedingly face-down position).
you're reaching to place glue down this hole, a special sort of glue. it's referred to as "Plastic Fusion" and you get it at a store for HVAC referred to as Grainger's. (Do a Google search on the net to search out close toest|the closest} Grainger's store near you.
Also, you wish sensible air ventilation as a result of the fumes from this glue ar unhealthful. scan the cautions on the rear label.) it's a 2-part glue and is incredibly thick. you would like the glue to fill the top of this hole no end the rotor from spinning. Use motorcar petrol on the tip of the rotor shaft shaft in order that the glue wouldn't persist with the rotor and it'd be unengaged to keep spinning. it's vital that the clock run and keep running the total time that this glue is drying.
you would like the glue to stay to the rear cowl of your clock movement however to not the rotor itself. to try and do this you wish to watch out to not place oil on the surface of the rear cowl close to the opening. However, you are doing desire a touch of oil down within the hole on the tip of the rotor shaft shaft. The safest thanks to management wherever the oil will and does not go is as follows. Before golf stroke the rear cowl on, dip the tip of the rotor shaft shaft into alittle petrol. Wipe off most of the oil by gently touching it to a clean, dry surface many times. Use the table high of my work bench. place the rotor back within the stepper.
Be terribly careful that the shaft shaft of the rotor is inform straight up and down and not off to the facet alittle bit. The rotor itself may be a very little magnet and therefore the metal it sits next to is additionally slightly magnetic. the key to creating the rotor arise straight is to rotate it by forty five degrees or ninety degrees in order that its own flux is correctly aligned with the residual magnetic fields of the 2 items of metal on either facet of the rotor. simply play with it, you will get it. If the rotor shaft shaft isn't straight up and down once you place the rear cowl on, then you may break one thing, (the very little shaft socket towards the front of the clock). it's doable to mend a chance like this however it's terribly particular. simply watch out and do not break it, OK?
Gently place the rear cowl on whereas keeping the clock movement in an exceedingly face-down position. Oil might try and set out the opening. Gently dab it off to stay the encompassing space dry. you will like better to highly to|favor to|opt to} use one thing more applicable, sort of a rag or tissue.
place the battery within the clock in order that it runs. you will need to quickly place the used back on the clock to verify that it's running properly whereas in an exceedingly face-down position. Take the used off once more as a result of it gets within the manner whereas you're making an attempt to try and do the gluing. strive exploitation spool of solder (because it's a hole within the middle), as an area wherever you'll set the clock movement down in an exceedingly face-down position. you will have another item, (such as alittle wood board with a hole in it), that's convenient for you.
false impression your 2-part glue and gently push alittle little bit of it down the opening. This last half is a lot of art than science. Use your best judgement. it's higher to err on the facet of insufficient glue down the opening instead of an excessive amount of.
place a giant clump of glue (~ 1/3 in. in diameter) round the whole space. the miscroscopic clump of glue down the opening has nothing to stay to attributable to the oil. What holds it in situ is that the massive clump of glue. it's vital that the clock keeps running for the total time that the glue is drying. It takes the glue concerning associate degree hour or a pair of to dry.